Understanding Plumber Tape and Its Uses
What Is Plumber Tape?
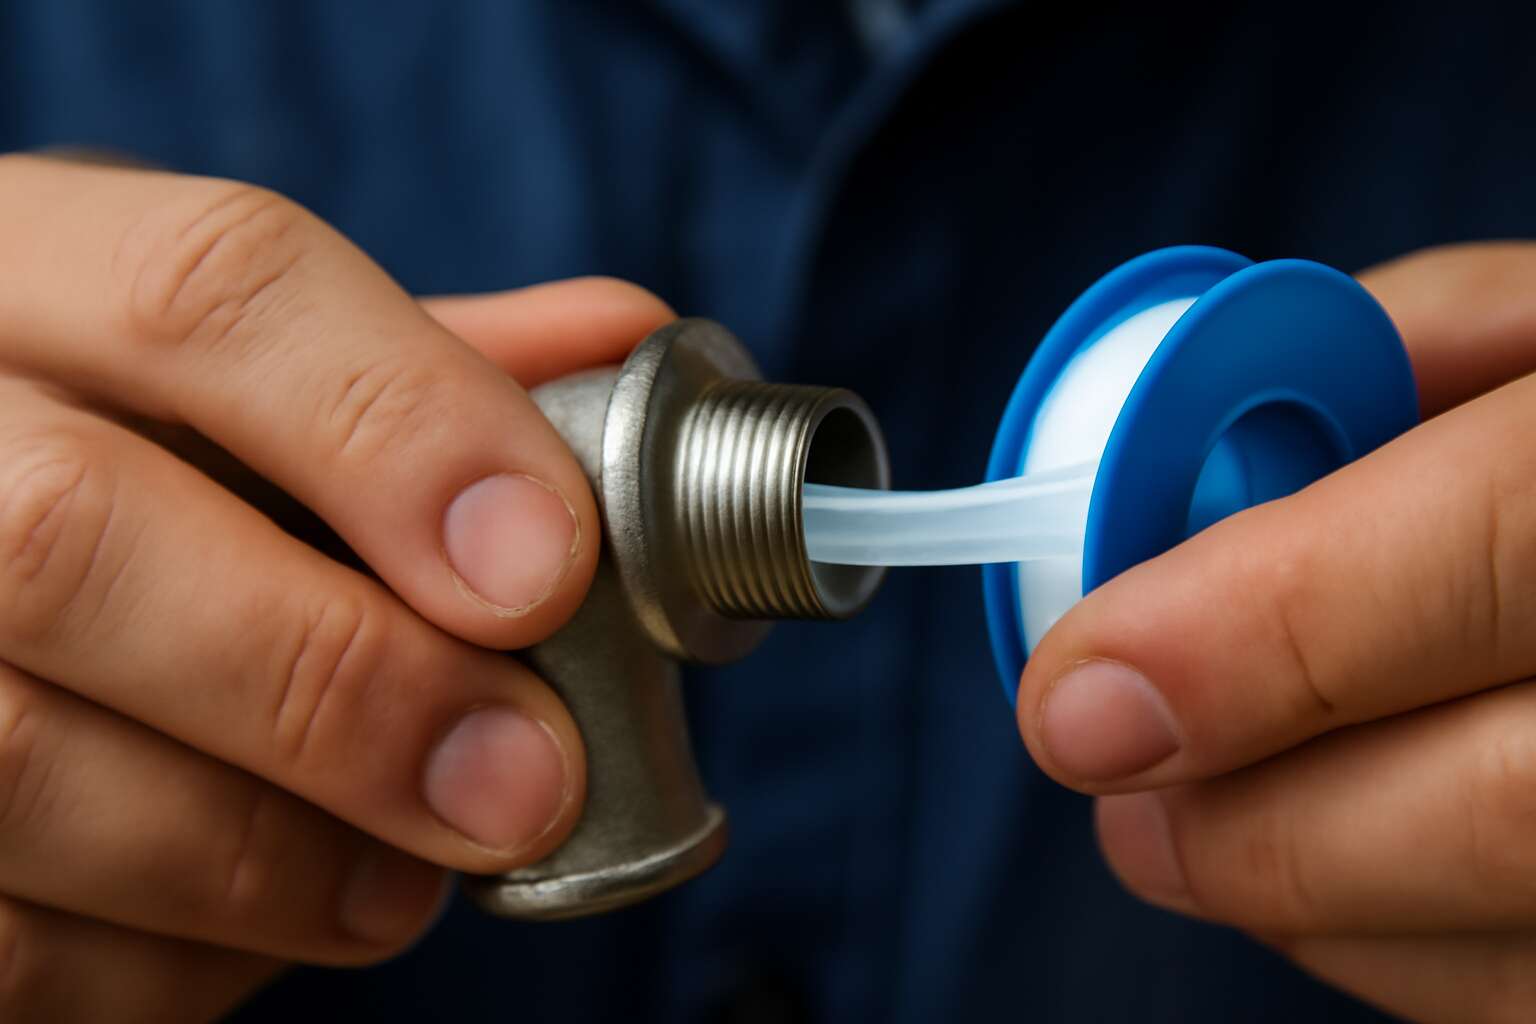
Understanding plumber tape, often called Teflon tape, is essential for anyone tackling plumbing repairs or installations. This thin, polytetrafluoroethylene (PTFE) tape creates a reliable seal on threaded pipe connections, preventing leaks and ensuring longevity. The question often asked is, “how much plumber tape to use?” The answer hinges on the size and type of connection, but a good rule of thumb is to wrap the tape around the male thread 2-3 times. This provides enough coverage to seal gaps without excess buildup that could interfere with fittings.
Using too little tape may leave gaps, leading to leaks, while excess can make tightening difficult or damage the threads. For most household applications, a standard length of 10-15 centimeters of plumber tape is sufficient. Properly applied, the tape should conform snugly to the thread’s contours, creating a tight seal without overdoing it. Remember, the goal is to use just enough plumber tape to fill the microscopic gaps—nothing more, nothing less.
Common Types of Plumbing Tape
Understanding plumber tape and its versatile uses is essential for anyone who’s ever faced a stubborn leak or a piping project in the heart of rural South Africa. This humble roll of PTFE tape can be the difference between a secure, leak-free connection and a frustrating dribble of water. When it comes to how much plumber tape to use, the key is balance—enough to fill the microscopic gaps but not so much that it hampers fittings or causes damage.
There are common types of plumbing tape tailored for different needs. Most household repairs call for standard white plumber tape, which is affordable and effective. For more demanding applications, such as high-pressure fittings or gas lines, a thicker, more durable tape might be necessary. The selection of the right type ensures longevity and a snug fit, especially important in rural areas where access to repairs can be limited.
- Wrap the tape 2-3 times around the male thread, ensuring even coverage without excess.
- Adjust the number of wraps based on the size of the fitting; larger connections may require a little more tape.
- Always press the tape into the threads to conform snugly, avoiding loose ends that could unravel.
In the end, knowing how much plumber tape to use is about respecting the delicate balance between security and ease of fitting. When applied correctly, this simple material can significantly extend the life of a plumbing system, making it a trusted companion in rural homes and busy farmsteads alike.
Why Proper Application Matters
Mastering the art of plumbing is a delicate dance, especially when it comes to applying plumber tape. An improper amount can spell disaster—either a slow leak that persists or a rigid connection that refuses to tighten. The question remains: how much plumber tape to use? The answer lies in understanding the subtle nuances of proper application. Too little, and microscopic gaps remain, risking future drips. Too much, and the fitting becomes cumbersome, risking damage to delicate threads. It’s a balancing act, one that demands precision and care.
Proper application involves wrapping the tape evenly around the male threads, typically 2-3 times. This ensures a snug fit without excess material that could interfere with the connection. Larger fittings may necessitate an extra wrap or two, especially in high-pressure scenarios common in rural South African homes. Pressing the tape into the threads as you wrap helps conform it snugly, preventing loose ends that could unravel over time. When you understand how much plumber tape to use, you’re not just sealing a joint—you’re safeguarding it against future failures and costly repairs.
Factors Influencing the Amount of Plumber Tape Needed
Type of Plumbing Connection
The subtleties of plumbing often hinge on the seemingly modest application of plumber tape, a material whose importance belies its unassuming appearance. When considering how much plumber tape to use, the nature of the plumbing connection becomes a decisive factor. An overly generous amount risks excess buildup that can impede flow, while insufficient coverage jeopardizes the seal’s integrity. The type of connection—be it a threaded fitting, compression joint, or flare connection—dictates the appropriate quantity needed to prevent leaks without creating unnecessary waste.
For threaded fittings, a meticulous wrap—typically around three to four layers—ensures a tight seal that withstands pressure over time. Conversely, in compression or flare connections, a thinner application suffices, as the seal relies more on the fitting’s design than the tape. To help navigate this nuanced decision-making process, consider these guidelines:
- Evaluate the connection type and its susceptibility to leaks.
- Assess the pressure and temperature conditions the joint must endure.
- Adjust the amount of plumber tape accordingly, erring slightly on the side of caution without over-taping.
Ultimately, the question of how much plumber tape to use is intertwined with understanding the specific plumbing scenario—each connection demands a tailored approach that balances thoroughness with efficiency. Only then can one truly master the art of sealing with precision and confidence.
Size of Fittings and Threads
The size of fittings and threads plays a pivotal role in determining how much plumber tape to use. Larger fittings with more prominent threads typically require a more substantial wrap to ensure an effective seal, while smaller connections demand a more delicate touch. The intricate dance between thread size and tape application isn’t just about quantity—it’s about understanding the subtle nuances that prevent leaks and maintain system integrity. When threads are coarse or heavily threaded, applying around three to four layers of plumber tape is often advisable to fill the gaps effectively.
Conversely, for finer or less aggressive threads, a thinner application, perhaps two layers, suffices. It is essential to evaluate each connection individually, considering factors such as the pipe’s pressure and the nature of the material. An overly generous amount of tape can lead to excess buildup, which might impair flow or cause fittings to seize, while too little leaves the system vulnerable to leaks. Striking the right balance is a skill honed through experience and awareness of the specific plumbing scenario.
- Thread size and pitch
- Material compatibility
- Expected pressure and temperature conditions
- Type of connection (threaded, compression, flare)
Material of Pipes and Fittings
The material of pipes and fittings significantly influences how much plumber tape to use. Different materials react uniquely to tape application, affecting the seal’s durability and effectiveness. For example, metal fittings like brass and copper often require a thicker layer of plumber tape because their threads are coarse and tightly threaded. This helps fill gaps and prevents leaks under high pressure. In contrast, plastic or PVC fittings typically need less tape—just a couple of layers—since their threads are finer and less prone to leakage.
It’s crucial to consider the material’s compatibility with the tape. Using the wrong type or too much can cause buildup or seizure, complicating future maintenance. When working with diverse materials, I often rely on a simple rule: evaluate the thread’s texture and pressure expectations. For high-pressure systems, applying a slightly more generous amount of plumber tape can make a real difference in ensuring a lasting seal. Remember, understanding the material’s nature is key to knowing how much plumber tape to use effectively.
Application Environment and Conditions
When it comes to sealing pipes, the environment and conditions where you’re working can turn a straightforward task into a game of plumbing roulette. Humidity, temperature fluctuations, and even the pressure of the water itself play a sneaky role in how much plumber tape to use. High-pressure systems demand a more generous layer—think of it as giving your fittings a cozy blanket to prevent leaks. Conversely, in dry, low-pressure environments, a modest wrap suffices, saving you from the dreaded tape buildup that can turn a simple job into a comedy of errors.
Moreover, the nature of the environment—whether it’s a bustling kitchen or a serene garden hose connection—affects the application. For outdoor fittings exposed to the elements, a slightly thicker application can provide extra resilience against weather-induced wear and tear. Sometimes, the best approach is to use an ordered method:
- Assess pressure expectations,
- Factor in environmental conditions,
- Then determine how much plumber tape to use accordingly.
This strategic layering ensures your plumbing isn’t just a quick fix but a lasting solution, no matter where you’re working in South Africa’s diverse climate zones.
Guidelines for Applying Plumber Tape Effectively
Preparing the Fittings Before Taping
Applying plumber tape correctly can mean the difference between a leak-free connection and a costly mess. Proper preparation of fittings is essential before applying the tape. Clean and dry all threads thoroughly — any dirt or moisture can compromise the seal. Once the fittings are prepped, it’s time to consider how much plumber tape to use. Using too little may result in leaks, while excessive tape can cause cross-threading or prevent fittings from tightening properly.
To ensure a perfect fit, I recommend wrapping the tape around the threads in the direction of the fitting’s screwing motion. This allows the tape to stay in place as you tighten, forming a tight seal without excess buildup. You might find it helpful to follow a simple guideline:
- Wrap the tape around the threads 3-4 times for standard fittings.
This provides enough coverage to prevent leaks without overwhelming the connection. Remember, when asking yourself how much plumber tape to use, less is often more — but never so little that it compromises the seal. Balancing this ensures plumbing connections remain secure and watertight for years to come.
How Much Tape to Use per Connection
When it comes to sealing the deal in plumbing, knowing how much plumber tape to use can be the difference between a watertight marvel and a soggy disaster. Surprisingly, many DIY enthusiasts and seasoned pros alike fall into the trap of over- or under-taping, leading to leaks or stripped threads. The secret lies in striking a delicate balance—like a tightrope walker with a roll of tape in hand!
Applying the right amount of plumber tape involves a simple yet effective rule: wrap around the threads 3-4 times. This amount is enough to create a snug, leak-proof seal without overdoing it. Remember, the goal isn’t to plaster the entire fitting in tape but to build a thin, even layer that fills the tiny gaps where water might sneak through. Too much tape can cause cross-threading or prevent fittings from tightening properly, while too little leaves the connection vulnerable to drips.
For those curious about the finer details, consider the size of the fitting and the thread type, as larger or finer threads may require a slight adjustment in how much plumber tape to use. In the end, it’s about applying just enough to make your plumbing connection secure without turning it into a sticky, frustrating mess. Because when it comes to plumbing, a little tape goes a long way—if you know how much plumber tape to use.
Number of Tape Wraps Recommended
When it comes to plumbing, accuracy is everything—especially when it involves how much plumber tape to use. Over-taping can turn a simple connection into a sticky nightmare, while under-taping leaves you with leaks that are as stubborn as a South African drought. The secret sauce? A balanced approach that’s as precise as a surgeon’s scalpel, but way more fun!
Generally, wrapping around the threads 3-4 times is the sweet spot for most fittings. This number strikes a perfect harmony: enough to fill tiny gaps without creating a mess or risking cross-threading. Think of it as seasoning your favorite braai—just enough to enhance the flavor without overpowering the meat. Too many wraps can cause fittings to jam or strip, while too few leave your connection vulnerable to drips and dribbles.
For those who love details, consider the thread type and size—larger or finer threads might need a slight adjustment in how much plumber tape you apply. Remember, the goal isn’t to coat the entire fitting in tape but to build a thin, even layer that acts like a water-resistant superhero cape—protecting but not suffocating the connection.
- Wrap the tape firmly but not excessively tight—there’s no need to turn your plumbing into a wrestling match.
- Ensure the tape adheres smoothly, avoiding wrinkles or gaps—because even the tiniest flaw can turn into a leak.
- Always wrap in the direction of the threads to prevent unwrapping during tightening—think of it as giving your fittings a gentle hug, not a chokehold.
Ultimately, knowing how much plumber tape to use isn’t rocket science, but it does require a dash of finesse—and maybe a little patience. After all, a well-taped connection is the difference between a dry day and an unexpected soggy surprise. So, next time you’re at the tap, remember: moderation is key, and 3-4 wraps is usually all you need to keep those leaks at bay in South Africa’s unpredictable climate.
Ensuring Proper Tension and Seal
Applying plumber tape with finesse is akin to wielding a magic wand—each turn and twist can transform a potential leak into a fortress of water resistance. Ensuring proper tension during application is crucial. Too tight, and you risk damaging the threads; too loose, and the seal could be compromised. The key is to apply a steady, even pressure that conforms the tape snugly around the threads without squeezing the life out of the connection.
To achieve this delicate balance, start by unrolling a sufficient length of tape—usually about 10-15 centimeters—and press it firmly as you wind it around the threads in the direction of tightening. Remember, wrapping in the correct direction prevents the tape from unravelling when you tighten the fitting. For effective sealing, aim for a smooth, wrinkle-free layer that covers the entire threaded area without overlapping excessively. This ensures a watertight seal that holds up in South Africa’s diverse environments.
In the quest for perfect application, consider this simple guideline: for most fittings, 3-4 wraps are enough. If you’re working with larger or more delicate threads, adjust accordingly. The goal isn’t to create a thick, bulky coating but to build a thin, resilient shield. Proper tension and even coverage are your allies in mastering how much plumber tape to use for a leak-proof connection—turning ordinary plumbing into an act of quiet craftsmanship.
Step-by-Step Instructions for Applying Plumber Tape
Wrapping Technique for Different Fittings
Applying plumber tape may seem straightforward, but mastering the technique ensures a leak-proof seal that stands the test of time. When considering how much plumber tape to use, precision is key—too little, and the connection risks leaks; too much, and it can cause cross-threading or improper fitting. The goal is to create a thin, even layer that fills the gaps between threads without excess bulk. This delicate balance transforms a simple task into an art form, reminiscent of a craftsman’s touch.
To achieve this, start by wrapping the tape around the male threads in a clockwise direction, following the natural thread pattern. For most fittings, two to three wraps are sufficient, but the exact number may vary based on the thread size and pipe material. For larger fittings or deeper threads, you might need to increase the wraps slightly, ensuring a snug fit without overdoing it. Remember, the question of how much plumber tape to use is less about quantity and more about the quality of the wrap—each turn should build on the last, creating a seamless barrier against leaks.
In practice, a simple step-by-step approach can help. First, hold the tape taut as you wrap, overlapping each layer by about half the tape’s width. When you reach the end of the thread, press the tape down firmly to ensure it adheres well. This careful process makes all the difference and guarantees that you’re using just the right amount of plumber tape for a durable, reliable seal.
Inspecting and Testing the Seal After Application
Applying plumber tape with precision can be the difference between a leak-proof connection and a soggy disaster. Once you’ve chosen the right type of plumbing tape and prepared your fittings, the next step is to ensure proper application. The goal is to create a seamless barrier without excess bulk—too much tape can cause cross-threading, while too little leaves gaps that lead to leaks.
Begin by wrapping the plumber tape around the male threads in a clockwise direction, following the natural pattern of the threads. For most standard fittings, two to three wraps are enough to achieve a reliable seal. When working with larger fittings or deeper threads, you might need to increase the wraps slightly, but always aim for a snug, even layer. Remember, the question of how much plumber tape to use is less about quantity and more about the quality of each wrap—each turn should build upon the last, filling gaps without creating excess buildup.
After wrapping, press the tape down firmly to ensure it adheres tightly to the threads. A helpful tip is to hold the fitting steady and inspect the tape’s coverage; it should be even, without loose edges. Once the tape is in place, screw the fitting into position with steady, controlled force. To verify the seal, a simple inspection and testing process is essential, especially when working on critical water or gas lines.
- Inspect for gaps or missed spots in the tape wrap.
- Hand tighten the connection to avoid cross-threading.
Finally, once assembled, turn on the water supply slowly and observe the connection closely. Look for any signs of dripping or moisture, which can indicate that the amount of plumber tape used was insufficient or improperly applied. This step ensures that your connection remains durable and leak-free over time, confirming that you’ve mastered how much plumber tape to use for a flawless fit. The meticulousness of this process transforms a simple task into a craftsmanship—one that guarantees peace of mind in every seal.
Common Mistakes to Avoid
Applying plumber tape might seem straightforward, but a tiny misstep can turn a simple fix into a soggy disaster. The key is knowing how much plumber tape to use—too little, and you’ll have leaks; too much, and the fitting risks cross-threading or getting jammed. It’s a balancing act that demands finesse, not brute force. Think of it like seasoning a dish—just enough to enhance, not overpower.
When wrapping your fittings, remember that the focus is on quality, not quantity. A common mistake is over-wrapping, which creates excess bulk and impairs proper tightening. Conversely, under-taping leaves gaps that water finds irresistible to seep through. To avoid this, use about two to three wraps for standard-sized fittings, ensuring each turn builds upon the last without excess buildup. For larger connections, a few additional wraps may be necessary, but always keep the layer snug and even.
One of the most overlooked steps is pressing the tape down firmly after wrapping. It’s tempting to rush, but a quick press ensures the tape adheres properly to the threads, helping you gauge how much plumber tape to use in future projects. Remember, the goal isn’t just to seal but to do so reliably over time—so inspecting the coverage before tightening the fitting is paramount. If you see loose edges or gaps, it’s a sign you’ve used too little or applied it unevenly.
- Over-wrapping can cause cross-threading
- Under-wrapping risks leaks
- Failing to press tape down might compromise the seal
Turning the fitting into place should be done with steady, controlled force—avoid the temptation to crank it down like a caveman. Once assembled, slowly turn on the water and keep a keen eye out for drips. If moisture appears, it’s a dead giveaway that you might need a bit more plumber tape or a redo of your wrapping technique. Achieving the perfect amount of plumber tape isn’t just about preventing leaks; it’s about mastering a craft that ensures long-lasting, reliable plumbing connections.
Tools and Accessories to Enhance Application
Recommended Tools for Taping
Equipping yourself with the right tools and accessories can make the difference between a damp, drippy disaster and a perfectly sealed connection. While plumber tape might seem straightforward, mastering how much plumber tape to use is essential for achieving a reliable seal. High-quality tape dispensers and precision-cut strips help ensure consistency, reducing waste and preventing over-application. For those seeking efficiency, a dedicated tape applicator can streamline the process, especially when working on multiple fittings in tight spaces.
When selecting tools for taping, consider the following essentials:
- Sharp scissors or a utility knife for cleanly cutting the tape
- Measuring tape or a ruler to gauge the correct length of tape needed
- Adjustable wrenches to tighten fittings without damaging the tape
Investing in these accessories not only enhances application accuracy but also diminishes material waste. Striking a balance in how much plumber tape to use ensures the seal is both tight and flexible, preventing potential leaks and prolonging the lifespan of plumbing installations across South Africa’s diverse environments.
Additional Sealants and Compounds
When embarking on the quest to create a flawless plumbing connection, the subtle art of wielding tools and accessories becomes paramount. Precision in application can transform a mundane task into a masterstroke of craftsmanship, ensuring that every joint remains impervious to the relentless march of leaks. Among these tools, dedicated tape dispensers and sharp cutting implements serve as the wizard’s wand and sword, guiding your hand with unwavering accuracy.
To elevate your taping mastery, consider integrating a few essential accessories into your toolkit. A measuring tape or a ruler is invaluable for gauging the perfect length of plumber tape, preventing waste and over-application. Sharp scissors or a utility knife carve through the tape with ease, ensuring clean, neat wraps that adhere seamlessly. An adjustable wrench then tightens fittings without compromising the integrity of the tape, sealing the connection with unwavering confidence.
For those seeking unparalleled efficiency, a dedicated tape applicator can turn a laborious chore into a swift ritual—particularly when working on multiple fittings across South Africa’s diverse environments. Remember, knowing how much plumber tape to use isn’t just about quantity; it’s about the harmony between flexibility and security. When wielded with the right tools and accessories, your plumbing endeavors will stand resilient against the test of time and water’s persistent embrace.
Proper Disposal and Storage of Plumbing Tape
In the world of plumbing, a miscalculated amount of plumber tape can turn a simple fix into a dripping disaster. That’s why having the right tools and accessories isn’t just a luxury—it’s a necessity. Precision, after all, is what separates a water-tight seal from a soggy mess. From measuring tapes to utility knives, each item plays a pivotal role in ensuring you don’t overdo or underdo the tape application. And when it comes to knowing how much plumber tape to use, these tools help you strike the perfect balance—no more, no less.
Proper disposal and storage of plumbing tape are equally crucial to maintain both safety and efficiency. Used tape should be rolled neatly and stored in a dry, accessible container—preferably away from moisture and direct sunlight. This prevents the tape from deteriorating prematurely and ensures it’s ready for the next plumbing adventure. Remember, a cluttered toolbox isn’t just an eyesore; it’s a recipe for waste and frustration.
- Dedicated tape dispensers streamline the application process, turning a tedious task into a swift, satisfying ritual.
- Sharp scissors or utility knives guarantee clean cuts, helping you avoid frayed edges that could compromise your seal.
- An adjustable wrench ensures fittings are tightened properly, preventing leaks caused by overtightening or under-tightening.
When you combine these accessories with good habits—like proper disposal and organized storage—you’ll master the art of applying just the right amount of plumber tape. The result? Plumbing connections that stand resilient against South Africa’s diverse water conditions, without wasting a single centimeter of tape or risking a leak that could dampen your day.
Troubleshooting and Tips for Optimal Results
Signs You Applied Too Little or Too Much Tape
Determining how much plumber tape to use can be the defining factor between a perfect seal and a frustrating leak. When applied with precision, the tape provides a seamless barrier against water and gas leaks, but over-application or insufficient use can compromise the entire connection. It’s a delicate balance—like threading a fine needle—that requires an eye for detail and a touch of finesse.
Signs you’ve applied too little tape include persistent leaks or a loose-fitting connection, while excess tape often results in difficulty tightening fittings or damaging the threads. To troubleshoot, always inspect the wrapped area carefully for gaps or excess material. Remember, a thin, even layer of plumber tape—usually 2-3 wraps—is sufficient for most connections. If you find yourself questioning how much plumber tape to use, consider the specific fitting size and type. Sometimes, less truly is more, and in other cases, a few extra wraps ensure a watertight bond.
Reapplying or Sealing Leaks
Troubleshooting plumbing leaks after applying tape is akin to unraveling a hidden mystery—sometimes, even the most meticulous taping can falter. When re-sealing or reapplying plumber tape, it’s essential to approach the task with patience and a keen eye. If a leak persists or the connection feels loose, consider whether the tape coverage was sufficient or overly generous.
To achieve optimal results, inspect the wrapped area carefully for gaps or uneven layers. Often, re-wrapping with a clean, evenly distributed layer of plumber tape—usually 2-3 wraps—restores the seal. Remember, applying too much tape can make tightening fittings difficult or damage threads. Sometimes, removing the old tape and starting fresh with a measured amount ensures a more reliable bond.
- Check for gaps or uneven tape coverage.
- Re-wrap with a consistent layer, typically 2-3 wraps.
- Ensure the tape direction matches the threading to prevent slippage.
When sealing fittings, adjusting the number of wraps based on fitting size and thread condition can make all the difference. If you’re questioning how much plumber tape to use, trust your instincts—less is often more, but don’t hesitate to add an extra layer if needed. Mastering this delicate balance transforms a potential leak into a steadfast seal, turning plumbing into a true art form.
Expert Tips for Long-Term Durability
When it comes to ensuring a long-lasting seal, troubleshooting plumbing leaks often hinges on understanding how much plumber tape to use. A common pitfall is either under-application, which leaves gaps for leaks, or over-application, making fittings difficult to tighten and risking damage. Expert plumbers know that precise application transforms a potential disaster into a durable fix.
For optimal results, always inspect the wrapped area for uneven coverage or gaps. Re-wrapping with 2-3 even layers of plumber tape typically strikes the perfect balance. Too little tape can compromise the seal, but too much can make threading cumbersome or even cause damage. Remember, matching the tape direction to the thread’s rotation ensures a secure grip without slippage. When in doubt, start with a conservative amount and add more if necessary—trust your instincts and experience.
Long-term durability depends on meticulous application. Applying the right amount of plumber tape not only prevents leaks but also extends the lifespan of fittings, especially in rural South African homes where access to plumbing support can be limited. A well-sealed connection is often the difference between a minor inconvenience and a major repair.
FAQs About Using Plumber Tape
Can I reuse plumbing tape?
When it comes to plumbing tape, or Teflon tape if you prefer a brand name, many wonder, “Can I reuse plumbing tape?” Well, the answer isn’t as straightforward as reusing grandma’s vintage teacup. In most cases, reusing plumbing tape isn’t advisable. Once it’s been compressed and exposed to water and debris, its sealing properties diminish faster than a soap opera plot twist. Reusing tape can lead to leaks, water wastage, and a whole lot of frustration—trust me, I’ve seen more drips than a leaky faucet in a sauna.
However, if the tape is still intact, clean, and hasn’t been compromised by dirt or corrosion, you might get away with a second use. But here’s where it gets tricky: knowing how much plumber tape to use is a fine art. Over-application can cause threads to jam, while too little leaves you with leaks and a very unamused plumber. So, unless you’re feeling lucky or just want to test fate, it’s best to use fresh tape for each connection. After all, a tight seal is worth the extra roll of tape, especially when minimal effort leads to maximum water tightness!
Is there a difference between PTFE tape and other types?
When it comes to sealing pipes securely, the question of how much plumber tape to use can be as perplexing as deciphering an ancient manuscript. Many homeowners and professionals alike wonder if there’s a magic number or a specific amount that guarantees a leak-proof connection. The truth is, the right quantity is a subtle art — too little, and water will seep through; too much, and you risk jamming the threads or damaging the fitting. It’s a delicate balance, and knowing how much plumber tape to use is essential for long-term durability.
Interestingly, the difference between PTFE tape and other types of plumbing tape isn’t just about material — it’s about purpose. PTFE tape, or Teflon tape, is renowned for its superior chemical resistance and low friction, making it the preferred choice for most plumbing tasks. Other tapes, such as rubber or cloth-based varieties, might serve specific purposes but generally don’t provide the same airtight seal. When considering how much plumber tape to use, the focus should be on wrapping enough layers to fill the gaps without excess bulk, typically 2-3 wraps around the male threads. This ensures a tight seal without risking thread jamming or damage.
In the world of plumbing, precision matters. The amount of tape applied can influence the entire connection’s integrity, which is why understanding the nuances of how much plumber tape to use is crucial. Remember, the goal isn’t to create a thick layer of tape but rather to ensure the threads are adequately covered with just enough material to prevent leaks. Whether you’re working on a garden tap or a complex pipe fitting, the right amount of PTFE tape can make all the difference in preventing future headaches and water wastage.
What do I do if the connection is still leaking?
If your plumbing connection continues to drip despite careful wrapping, you’re not alone. Sometimes, even when you’ve applied the recommended amount of plumber tape, leaks persist, leaving homeowners frustrated. The key isn’t just in the amount of plumber tape to use but in understanding what went wrong. Often, too little tape leaves gaps, while too much can jam the threads or create uneven pressure. If you’re asking yourself, “what do I do if the connection is still leaking?” don’t worry—there are steps to troubleshoot this. First, turn off the water supply and carefully disassemble the fitting.
Next, inspect the threads for damage or debris. Reapply the plumber tape, ensuring you’ve used the right amount—generally 2-3 wraps around the male threads. If leaks persist, consider re-taping with a fresh layer, making sure the tape is smooth and snug without excess. Sometimes, a minor adjustment in the wrapping technique or the quantity of plumber tape to use can make all the difference. To help you troubleshoot more effectively, here’s a quick guide:
- Disassemble the fitting and clean the threads thoroughly.
- Rewrap with 2-3 layers of plumber tape, ensuring even coverage.
- Reassemble tightly but avoid over-tightening, which can damage threads.
- Turn on the water and observe for leaks.
If leaks still occur after these steps, it may be time to consider alternative sealants or consult a professional. Remember, the right amount of plumber tape isn’t just a number—it’s about precision, technique, and understanding how much plumber tape to use to achieve a long-lasting, leak-proof connection. Sometimes, the smallest adjustments have the biggest impact—so don’t give up!

0 Comments